|
|
Molecular Modeling Pro Plus The Image Processor |
|
The
Drawing Window - menu item descriptions | The
Database Window - menu item descriptions |
|

The Image Processor is a tool for enhancing images
and saving them as WINDOWS bitmaps, JPEG files and HTML web pages. It includes a Java Script generator that
allows you to depict rotating molecules within an HTML web page.
The Image Processor is accessed through the Tools
menu.
The Image Processor Window appears after selecting
the menu item. In it is the currently
drawn molecule and any other graphics depicted in the Drawing Window. From the Edit menu of the Image Processor you
can crop an image, resize an image, adjust its brightness and contrast and add
text. You can overlay one image on top
of another with user selected transparency from the Edit window. From the File menu of the Image Processor
window you can Open and Save Images in bitmap or JPEG format.
Also from the File menu you can create HTML
pages. Before creating an HTML page add
text, crop and adjust brightness and contrast.
Here are instructions for creating a web page contatining a rotating
image.
1) Draw the molecule in the drawing screen.
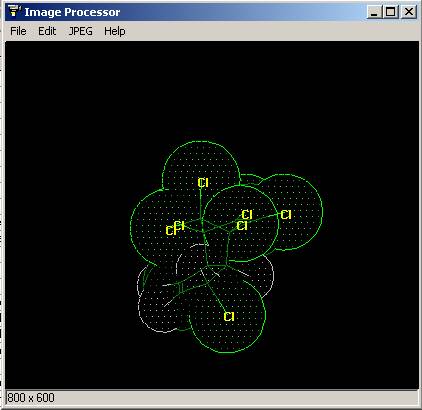
2) Select the Image Processor from the Tools menu. The Image Processor window will appear
(figure 1)
|
|
Figure
1. The Image Processor Window. From
this window you can save the picture of molecules as jpeg files or html
files. |
3) Add text to the drawing in the Image Processor
Window. Select "Add Text" from
the Edit menu. Type in the text in the
Text Editor. Click on the Font button
and select the font and font size you desire.
Hit the Done button. Hold down
the left mouse button and drag the text to where you want it. Do not worry about the image being covered
up. When the text is where you want it,
release the left mouse button. If you do
not like the result, hit the Undo button on the Edit menu.
4) Choose "Crop" from the bottom of the Edit
menu. Draw the box around the part of
the image you want to keep with the mouse.
To do push down the left mouse button at the upper left corner and drag
the cursor to the lower right corner while holding the mouse button down. Release the button at the lower right corner.
5) Choose "Save as HTML" from the File
menu. When prompted choose a file name
for the HTML page.
6) The HTML Editor appears. This window allows you
to add corporate logos, a title, text above and below the main image, create a
rotating molecule, add buttons to the page and a mail link. All of what is described below is
optional. If you do nothing but hit the
"Done" and HTML page will be created with nothing more on it than
what appears in the Image Processor Window. From top to bottom of this window,
here is what you can do with this window.
a) You can
set the background color for the entire page from the Options menu at the top
of the HTML Editing window.
|
|
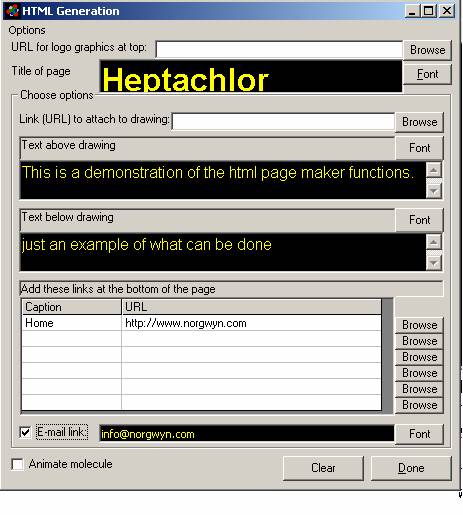
Figure
2. The HTML generator window. Fill in
the text boxes. Select the fonts and
background color. If you have a
company logo, type in the URL of the gif or jpeg file in the box at the top
of the window. If you want to create a rotating molecule check the animate
molecule box near the bottom of the page.
Filling in the spreadsheet will create buttons that can be linked to
other web pages. |
b) In the
text box labeled "URL for logo graphics at the top" you can place a
link to an image of your corporate or university logo. For example if you place this image in the
subdirectory /gif and the logo graphics file is named mycollege.gif you would
type in gif/mycollege.gif in this box.
If left blank, the program will ignore this part of the HTML page
creation.
c)
"Title of Page": Type
in the Title. Select the font button to
change the background color for the title, the text color, the font and the
font size. The Title appears between the
corporate logo graphics and any text you type in above the main image.
d) "Link
(URL) to attach to the Drawing". If
you assign a link, then clicking on the main image will send the user to the
designated URL. For instance, if you
type "http://www.norgwyn.com" here then clicking on the main image of
the molecule will send one to the Norgwyn Montgomery Software home page.
e) "Text
above drawing". You can type in
text here that will appear above the drawing of the molecule, for instance a
description of its use. The font, font
size, font color and font background color can be selected by clicking the
"Font" button to the right of the text box.
f) "Text below drawing": Places text below the image. Click on Font to change the font.
g) "Add
these links to the bottom of the page":
This adds buttons to the bottom of the page which when clicked will send
the user to some other URL. For
Instance, typing "HOME" in the captions column and
"http://www.norgwyn.com" in the URL column will place at button below
the image and text labeled "HOME" that when clicked will send one to
the Norgwyn Montgomery Software home page.
You can add several buttons.
h) If you want a mail link on the page, check the
check box and type in the e-mail address.
i) "Animate Molecule" check box. If you check this, Java Script will be
written that makes the molecule depicted in the image rotate around the Y
axis. Speed of rotation is a function of
image size (the smaller the faster it rotates).
The molecule Display mode will be the one selected in the Drawing
window.